Cherry Blossom Festival 櫻花節 ~ 花見
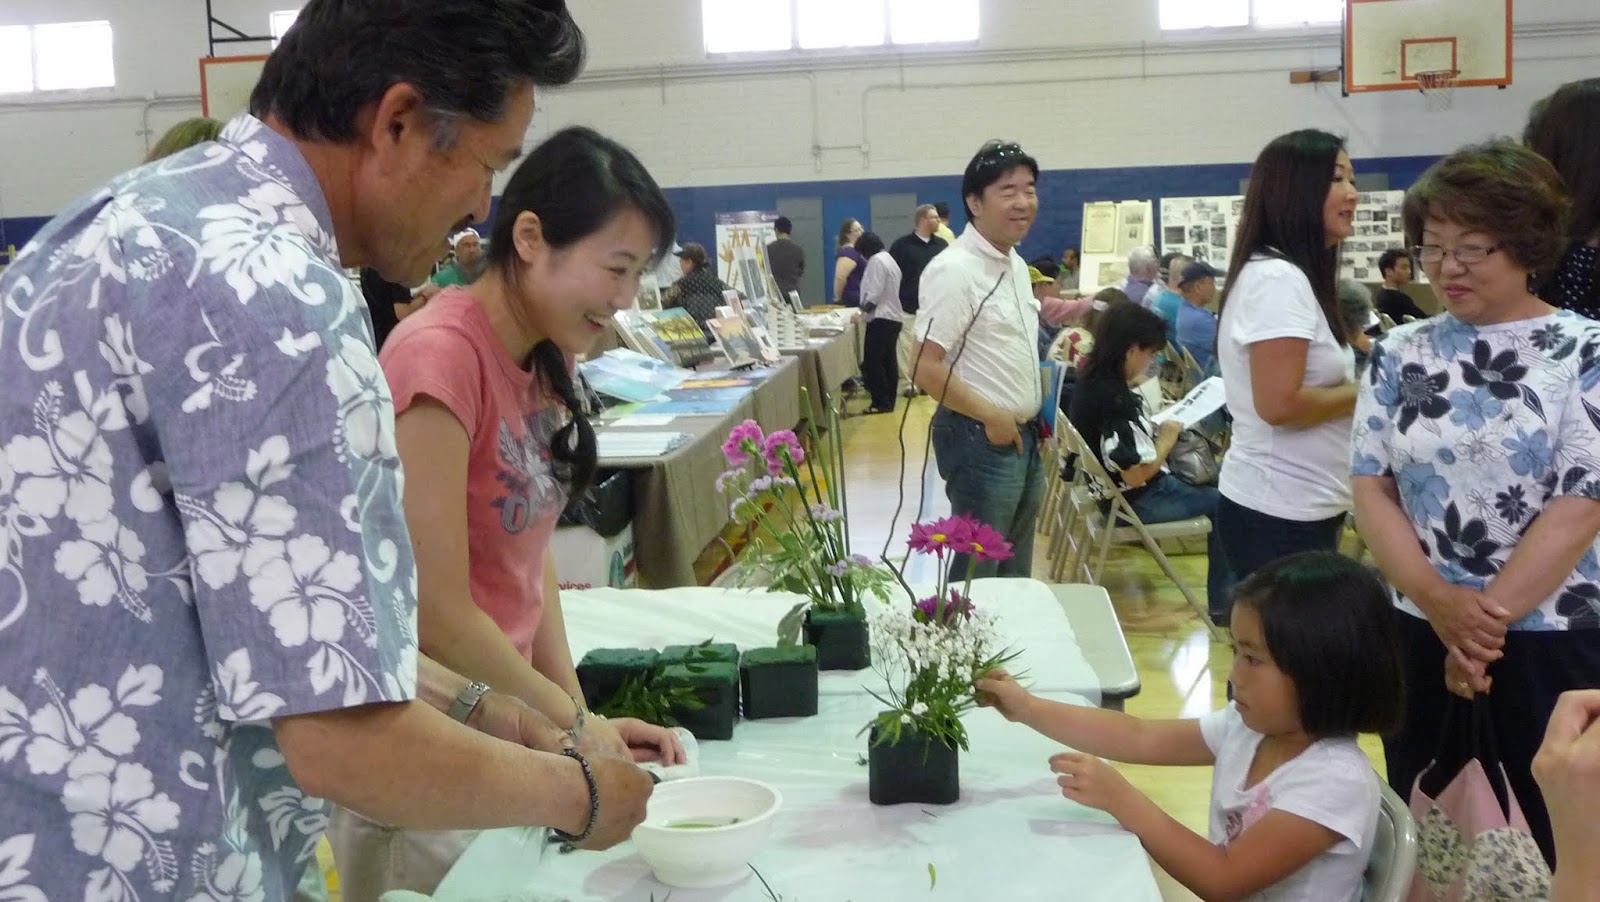
One of the most exciting class project for my Ikebana class is to hold the cherry blossom festival at the city hall. Every April, City of Monterey Park will hold a cherry blossom festival at Barnes Park and our teacher is always being invited to hold the Ikebana Expo and workshop. It’s labor intensive as it takes a lot of effort to setup the exhibition hall and carry all the heavy materials in-and-out; it’s tiring because it is a 2 days event with a lot of action in the workshop. However, when you see the big smile on the customers’ face, you know it is rewarding. Hope the teacher will change her mind of retiring and will hold the cherry blossom festival again next year~ ^^
花道班最令人興奮的課程/環節莫過於籌備櫻花節. 每年四月,蒙特利公園市都會假於巴恩斯公園舉行櫻花節. 我們的老師每年都會應邀舉辦花道展覽會及花道工作坊. 由籌備,佈置場地, 準備工作坊的花,至教授插花... 兩天的緊湊時間表,真的叫身心勞累. 但一看到顧客們滿足的笑容,這就表示所有的辛勞也是值得的. 希望老師會改變退休的主意,明年繼續舉辦這櫻花節.
Sometime it is hard to decide what to bring for a potluck. Fancy Macarons? Labor-intensive palmiers? Or something basic like apple pie? After a long debate between my evil left brain and my divine right head, I’ve chose the basic --- because, it's simple, it’s classic, it reminds you the good old time.
Thin-crusted apple tart. (Simplified, adapted from Michele Anna Jordan LA times recipe)
Ingredient:
1) Juice of 1 lemon
2) 3-5 apples depends on the size, peeled ( I used the apple with the size like a soft ball, 4 of them)
3) 3 Tbsp melted butter
4) 3 Tbsp granulated sugar
5) 1 tsp ground cinnamon
6) ⅛ ground clove
7) ⅛ tsp ground nutmeg
8) ½ cup of canned pear
9) A handful of dried cranberry
In order to honor a “BASIC and SIMPLE” apple tart, I chose to use Pillsbury pie dough instead of making it myself. =P
How to...
a) Pre-heat the oven @ 3750F
b) Halve the apple and remove the core & the stalk. Sliced the apple lengthwise into very
thin slices. Put the apple into a bowl of water added with lemon juice.
c) Unroll the pie dough and place it on a greased baking pan. Turn up the outer edge of the circle of the dough and form a rim. Use a fork to press the rim into place and prick the tart, bottom and the side, in several place.
d) Drain and dry the apples thoroughly (I lay apple in between paper towel and press on them generously)
e) Arrange a circle of overlapping apple slices staring at the far edge of the dough. Repeat for 2 layers.
f) After 2 layer of apple, put the pear slices and dried cranberry in the middle of the tart. Layer apple at the outer edge to make the filling at even level.
g) Layer a circle of overlapping apple slices again and finish with a small circle of apples in the center.
h) Brush the apple and outer rim of the dough with the melted butter.
i) In a small bowl, combine cinnamon, clove, nutmeg and sugar together. Sprinkle the mixture over the apple (I sprinkle a small amount of the mixture over each layer of the apples)
j)Bake the tart for 40-45 mins until the crust is golden brown.
Bon Appétit ~
薄蘋果餅
有時候真的不知道聚餐時該帶些什麼”貢品”. 法式花悄的馬卡龍 巧手工的Palmiers? 還是帶最簡單的蘋果批? 經過左右腦大戰三百會合後, 最終決定還是蘋果批---喜歡它的簡單,比較經典,能勾起心弦,回想起美好的回憶.
材料:
1) 檸檬1個,取汁
2) 蘋果3-5個視乎蘋果的大小. (我用與手球同樣大的蘋果4個)
3) 已溶的牛油3大湯匙
4) 白沙糖3大湯匙
5) 肉桂粉1小茶匙
6) 丁香粉 ⅛ 小茶匙
7) 肉荳蔻粉 ⅛ 小茶匙
8) 大概半杯 罐頭洋梨
9) 酸果蔓 適量
為配合簡單為題, 在此選用 預製的批底.
製作:
a) 預熱,焗爐大概3750F, 1900C
b) 把蘋果切半,去皮去心切薄片(大概1/16 寸薄) 放入已加檸檬水的冷水裡.
c) 展開 預製的批底,放在已塗油的焗盤上,把外緣疊上. 用叉把邊壓好, 在批底及側邊刺些小孔.
d) 用餐巾把蘋果印乾水份.
e) 把蘋果由批底外圈重疊擺放,重複兩`次.
f) 把洋梨片及酸果蔓放在批中心,盡量與蘋果的水平舖至一樣.
g) 再舖上蘋果片,重疊地,圍上圓圈. 最後在中央圍出一個小圓圈
h) 在蘋果及批邊塗上牛油
i) 於小碗裡, 把肉桂,丁香,肉荳蔻粉及糖混合/ 拌勻, 灑在蘋果上. (我在每一層都灑上少許)
j) 放入焗爐裡烤40-45 分鐘 至批辮呈金黃色.
Paul Jr.
Crochet~~ a word that will remind me about baby blanket, socks, dollies, etc, has never crossed my mind (as I thought that is a granny’s hobby =P) until I saw my friend’s post in facebook. “Oh man~ that’s consider crochet too??? That is too cute to be true!! ” That is the first thing pop up in my mind.
May I introduce to you~ Paul Jr.
鉤邊 / 鉤針 從未在我的腦海中出現過~原因是本人主觀地認為這是老太婆消磨時間的嗜好. 直到有一天, 看到好友舖在網上的相~”這是 鉤邊 / 鉤針做的嗎?? 太可愛了吧!!!”
先生女士們~ 讓我介紹: 章魚成小朋友
Monkey Bread
Monkey monkey monkey~ why monkey bread is called monkey bread? Why it’s also called African coffee cake. Is it because Africa has more wildlife, thus proportionally more monkey? Or because the act of pulling the bread by different people at different angle will reminiscent the behavior of a monkey? It’s still a myth ~ and the originality is questionable. If you like the from-the-scratch, double rise version (instead of using biscuits or pizza dough), here is the recipe:
Nutella Monkey bread
Ingredient:
Dry ingredient:
1) 6 cups all purpose flour
2) ½ tsp baking soda
3) ½ tsp baking powder
4) 1 ½ tsp salt
5) ⅓ cup sugar
Wet ingredient
1) 2 cups milk
2) ½ cup butter (1 stick)
Yeast for bread
a) 1 pack active dry yeast (I use Hodgson Mill ® Active dry yeast)
b) ¼ cup warm water (100-110oF degree)
c) ¼ tsp granulated sugar
Sugar-coating
a) ⅔ cup of granulated sugar or brown sugar if you prefer caramel taste
b) 1 tbsp ground cinnamon
c) 5-6 tbsp butter, melted.
Filling
a) Banana, ripped, four
b) Nutella spread, 3 tbsp
Action:
1) Proofing yeast-- per package instruction, dissolve yeast in ¼ cup of warm water and ¼ tsp sugar. If the mixture starts bubbling within 5 mins, that means the yeast is alive. I let it sits for 5-10 mins.
2) While waiting for the yeast to rise, scald the milk by heating up the milk over the stove. Once it starts to bubble, turn off the heat and remove the pot from the stove. Scalding milk helps denatured the milk protein and helps bread to rise better.
3) Add ½ cup of the butter into the hot milk, stir~stir~stir. Let the temperature cool down to 100-110oF before adding the yeast.
4) Mix all the dry ingredients together. In a large bowl, add ½ of the dry and ½ of the wet ingredients at a time and mix well. Repeat until all wet and dry ingredients are all mixed in.
5) Kneading: either knead the dough on a floured surface or like me: knead the dough with Kitchenaid ® electric mixer- speed 2 with the dough hook for 8-10 mins .
6) Cover the dough with a wet towel. For the best result, the dough should be placed in a warm and even temperature (draft-free) place to rise. I let it sit for a day and before I go to bed, I punch the dough down to the bottom and covered with a wet towel for overnight .
7) In the next day morning, check the dough-- it should rise again~ Divide the dough into small bite size ball. I use a pastry brush to brush the melted butter onto the dough.
8) Mix the ground cinnamon and sugar in a small bowl. Sprinkle the sugar-cinnamon onto the buttered dough.
9) Place 1 layer of sugar-coated dough into a bundt cake pan (which is greased with Pam ® non sticking spray). Mash the bananas with a fork; lay the bananas on top of the dough and drizzle nutella over the banana. (For easy spreading, put the nutella into a food storage bag and heat it up in a microwave for 20-30 second until warm and soft. Cut a small hole from one angle of the bag and squeeze the nutella out gradually.)
10) Put another layer of sugar-coated dough and sprinkle sugar-cinnamon on the top.
11) Put into a preheated oven @ 350o F and bake for 50 minutes. Check with a long skewer. If the skewer is clean after poking into the thickest part of the cake, that mean it’s done.
12) Rest in the pan until cool and then turn it over onto a plate. You can put more nutella on the top and finished off with some chopped walnut.
Bon Appétit ~
猴子(腦)麵包
哈哈~ 開玩笑的~ 若果真的是用猴子腦做食材, 筆者必定會官誹纏身 Monkey Bread 又稱為 African coffee cake, 一般都在美國國家出現 ( 美國以外的國家, 甚少見此烘焙或知道這是什麼家伙 ) 為什麼得此名稱? 是因為吃它時,你拉我扯的動作疑似猴子?或是非洲草原多猴子而得其名? 無從考究~獨創性~原著性亦 不得而知. 管它的~若要試試make from scratch~ 可試試這食譜:
材料:
乾材料
1) 6 杯中筋麵粉 (270 gram)
2) ½ 小茶匙 梳打粉
3) ½ 小茶匙 泡打粉
4) ½ 小茶匙 食鹽
5) ⅓ 杯 白糖 (75 gram)
濕材料
1) 2 杯牛奶 (480ml)
2) 1/2 杯牛油 (113 gram)
酵母
1) 1 包乾酵母 (我選用了Hodgson Mill ®酵母)
2) ¼ 小茶匙 糖
3) ¼ 杯溫水 (37.7-43.30 C, 100-1100 F)
糖衣
1) ⅔ 杯糖 (或黃糖若比較喜歡焦糖口味)
2) 1 大湯匙肉桂粉
3)5-6 大湯匙已融化的牛油
餡料
1) 4條大香蕉,壓成蓉
2)Nutella 榛子醬
製作方法
1) 先將酵母放入溫水 (1/4 杯)中融化,加入1/4 小茶匙糖,發酵5-10分鐘. (若果酵母在5分鐘內起泡沫狀,表示酵母還活著,能用)
2) 與此同時,用厚底煲灼燙牛奶. 當牛奶開始沸騰時,關火, 待冷卻. (灼燙牛奶有助麵包發酵)
3)加入牛油(半杯,113gram) 待融化. 當溫度降至100-110度華氏,37.7-43.3度攝氏時,加入(1) 酵母
4) 把所有乾材料混合拌勻,分批把乾.濕材料(每次各一半)倒入大容器內拌勻.
5)揉捏麵團-手揉或機器揉(用二號速度,kitchenaids) - 8-10分鐘.
6) 用濕毛巾覆蓋著麵團,放在溫暖無風的地方讓麵團發酵. (我讓麵團發酵一整天. 睡覺前把麵團壓扁,放上濕布)
7)第二天早上查看麵團,這時麵團應該漲起來. 把麵團分開變成小球
8) 麵團塗上已融的牛油,洒上肉桂糖衣, 放入bundt蛋糕盤中(已塗油)
9) 放滿一層底層的麵團後, 舖上一層香蕉蓉, 再倒入Nutella 榛子醬. (若要令Nutella 榛子醬容易一點操作: 於密實袋中加入榛子醬, 加一小茶匙牛油,於微波爐預熱20-30秒. 在密實袋的其中一個角中剪去作為 缺口,於缺口擠出榛子醬. )
10) 再放上另一層已加糖衣的麵團, 洒上餘下的肉桂糖.
11) 預熱焗爐 350度華氏/177度攝氏, 蛋糕盤放入已預熱的焗爐焗50分鐘. 若果長竹籤插入最厚的地方,拉出時沒有麵漿粘著竹籤,已代表monkeybread 已完成.
12) 待蛋糕盤/麵包冷卻後, 把麵包倒轉倒出,放在別的碟子上. 隨個人喜好 加上果仁, Nutella 榛子醬.