Margarita jello and mandarin chicken salad
I was working on both Labor Day weekend and Labor Day thinking I could relieve my co-workers for the 3 days weekend. While they were enjoying the long weekend, I got to do something to make my working weekend/holiday more enjoyable. As a foodie, I endorsed the “eat-love-drink” way to brighten my day so I joined the Labor Day potluck on 6 floor. I made the mandarin chicken salad because it does not require a lot of cooking (it was 100oF, too hot for cooking X_X) and it’s easy to make. I made the Margarita jello for my friends ~~ just to have a refreshing treat to “celebrate” the day that we are reminded to be a hard working labor.
Margarita Jello (served 12 jello modes)
Ingredient:
1) Kirkland premium Golden Margarita ready to drink mix, 1 ¾ cup
2) Hot water 1 ¾ cup
3) Splenda 2 small packages or sugar 1/4 cup (or adjust to your taste)
4) Unflavored gelatin powder , 4 packages
5) Fruits (optional)
6) Food/jello mode—spray Pam ® on the surface <If you don’t have the jello mode, use any shallow pan will do>
Instruction:
i) Bloom the gelatin powder in hot water
ii) Add sugar in the hot water
iii) Slowly pour the hot-sugar water into the Margarita drink mix
iv) Mix the water and the drink mix well, and then pour into jello mode. Add fruit pieces if desired.
v) Chill the jello for about 1.5-2 hours until its all set.
vi) When serve, dip the jello mode in hot water for 15-20 seconds, use a toothpick to scrape/detach the jello from the mode. Turn the mode upside down on a plate and the jello is ready!
Mandarin Chicken Salad (serving- 1 full 9x13x2 pan)
Ingredient:
1) 1 full chicken breast (around 1.5 pounds)
2) 1 Red bell pepper, cut into bite size
3) 1 cucumber, sliced and skinned
4) 1 bag of prewashed green leafy salad (spinach, tarragon, spring mix, etc)
5) 1 can (12-15 oz) mandarin orange, drained
6) 2/3 box of Barilla Campanelle pasta, cook for 10 minute for “al dente “ texture- refer to cooking instruction on the box.
7) A hand-full of dried cranberries.
8) Salad dressing: 1/3 cup vegetable oil, ¼ cup rice vinegar, ¼ cup orange juice, 2 tsp sugar, 1 tsp ground ginger, 1 clove garlic-minced, 1 tsp sesame oil. Mixed everything in a bowl and chill in the fridge for at least 30 minutes (or longer)
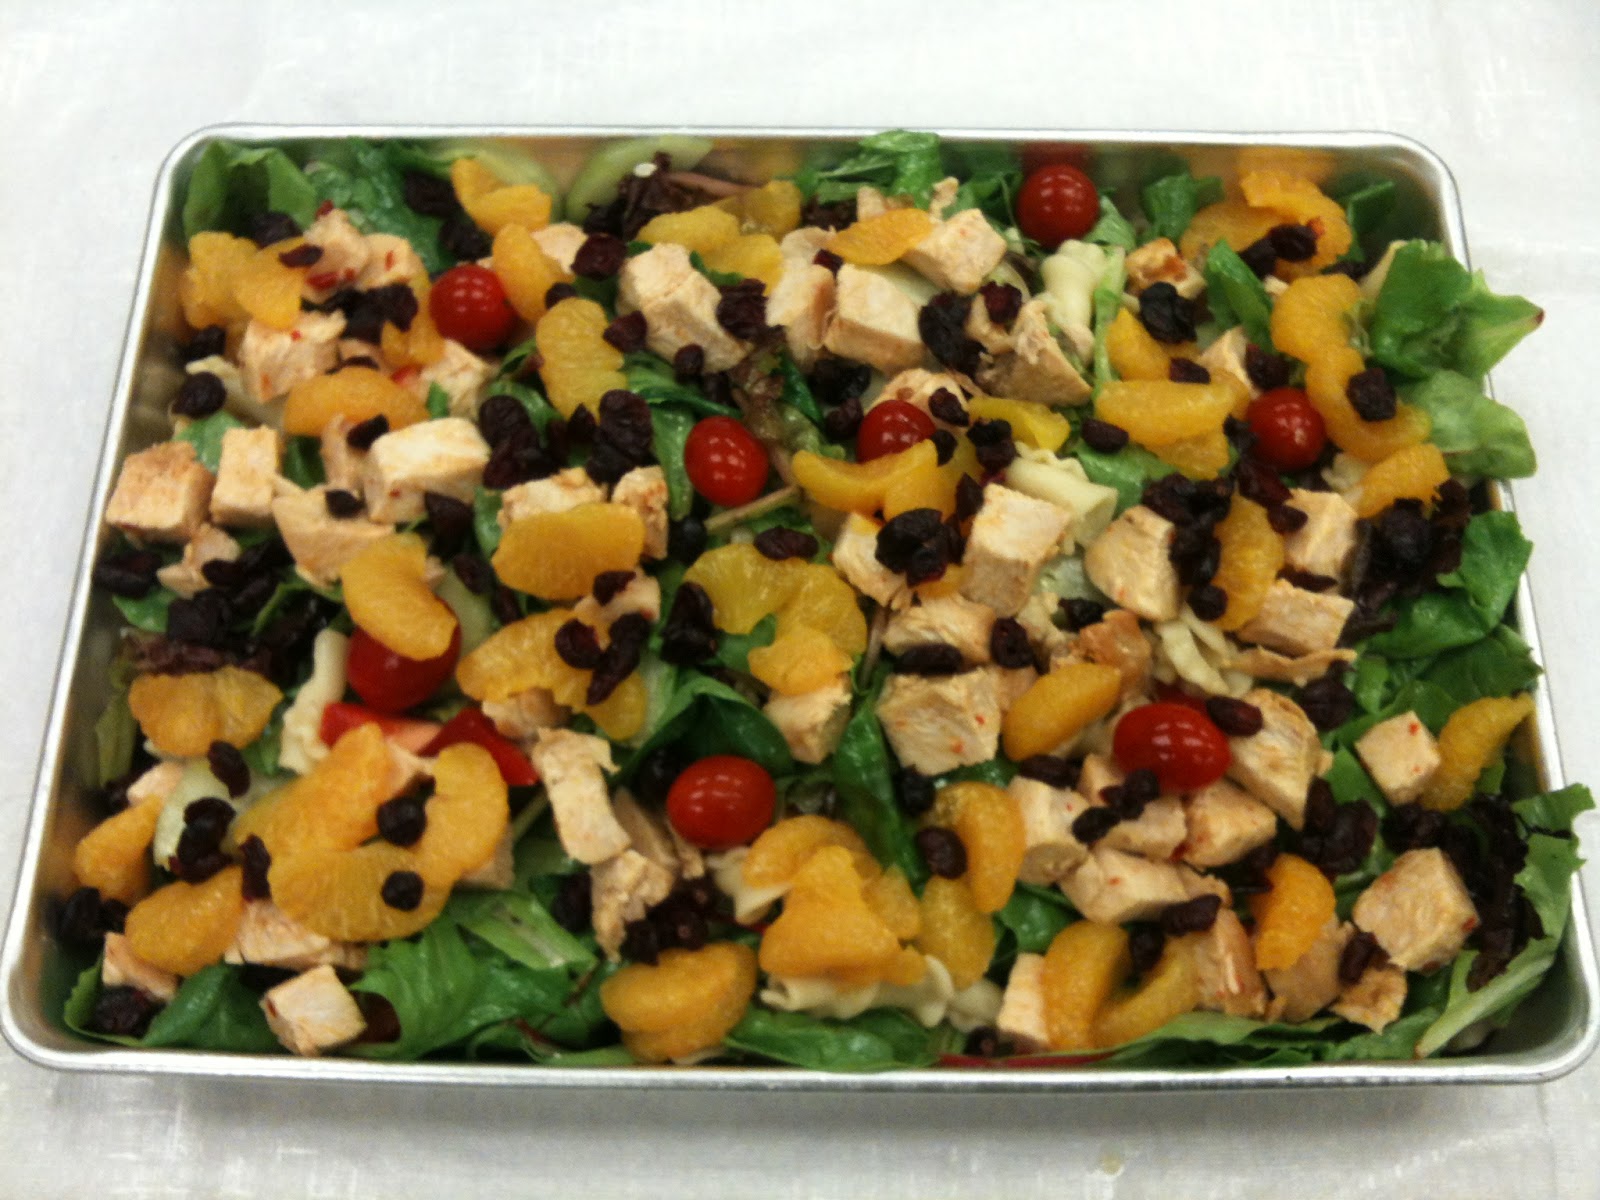
Instruction:
i) Cook the chicken until the internal temperature has reached 160oF (use whatever method- I pan fried the chicken), set it aside and let it cool before cutting into bite size. I coated the chicken bite with some Thai sweet-and-chili chicken sauce—just enough to make a thin coating.
ii) Cook and drain the pasta, set it aside until cool (and I coated the pasta with some oil to prevent it get stuck together)
iii) In a big bowl, mix the pasta, bell pepper, cucumber, leafy green salad, chicken bites and salad dressing together. Pour it over a nice display plate/pan
iv) Pour the mandarin orange over the top evenly; sprinkle the dried cranberries on the top.
v) Bon Appétit~
瑪格麗塔雞尾酒果凍及蜜橘雞肉沙拉
勞動節週末和勞動節當天我都選擇了上班, 心想這樣可以讓同事們有3天的週末假期。當他們享受著長週末假期的同時,我也得做些事, 好令我的工作週末/假日愉快一點。一個愛吃如我的人,我贊成以“飲飲食食”的方式來改變一下假日上班的心情; 所以,我加入了6樓那層的勞工節聚餐。我的蜜橘雞肉沙拉簡單易作, 並不需要很多烹煮時間(100℉實在是太熱了~不想做飯X_X)。我做了瑪格麗特果凍給我的朋友們〜〜用一種清新的甜品去“慶祝”我們那體力勞動的付出。
瑪格麗塔果凍(能做12個果凍模)
主要成份:
1)Kirkland premium Golden Margarita ready to drink mix,1¾杯
2)熱水1¾杯
3)Splenda代糖 2小包裝或糖1/4杯(或隨自己的口味調教)
4)無味的凝膠粉/魚膠粉,4包
5)水果(隨個人喜歡,可加可刪除)
6)食品/果凍模, 用不沾鍋噴霧PAM®噴在果凍模的表面<若你沒有果凍模, 可使用任何淺一點的盤>
說明:
I)在熱水中把凝膠粉/魚膠粉溶解
II)加糖入熱水中
III)把熱糖水慢慢倒入瑪格麗塔飲料中
IV)把糖水及瑪格麗塔飲料拌勻,然後倒入果凍模中。隨個人喜歡,添加水果片。
V)把果凍放入冷相約1.5-2小時,直到果凍凝固。
VI)食用前, 把果凍模底部浸在熱水中約15-20秒,用牙籤刮果凍模與果凍之間的地方。將模倒過來放在盤子裡, 果凍脫落在盤子中~開動!
蜜橘雞肉沙拉(能做1鍋9x13x2 大的鍋的份量)
主要成份:
1)1雞胸肉(約1.5磅)
2)1個紅燈籠椒,切成一口大小
3)1根黃瓜,切片,剝皮
4)預洗的綠葉沙拉1袋(菠菜,龍蒿,菜苗等等)
5)1罐(12-15盎司)橘子,把水倒掉
6)2/3盒的Barilla Campanelle意大利面,煮10分鐘至“嚼勁”軟硬程度, 請參考包裝盒上的烹飪指示。
7)一手那麼多的蔓越莓。
8)沙拉醬1/3杯蔬菜油,¼杯米醋,¼杯橙汁,2茶匙糖,1茶匙姜蓉,1瓣大蒜碎,1茶匙麻油。把所有材料都混合在一個碗裡,放進冰箱冷藏,至少30分鐘(或更長)
說明:
I)把雞煮至內部溫度達到160℉(使用任何方法把雞煮熟,我選擇了用煎的方法),把它放在一邊,讓它冷卻,然後切成一口大小。我用泰式甜辣椒雞醬薄薄的塗在雞上。
II)把意粉煮熟,放在一邊待冷卻(我加了一些油拌勻,以防止意粉粘在一起)
III)在一個大碗裡,把意粉,甜椒,黃瓜,蔬菜沙拉,雞肉和沙拉醬混合在一起。然後放在碟子上
IV)把橘子均勻地倒在意粉沙拉上面, 再灑上蔓越莓。
V)開動〜
Showing posts with label Recipes. Show all posts
Monday, September 17, 2012
Sunday, May 13, 2012
Japanese Bread Pudding 日式麵包布丁
Japanese Bread Pudding日式麵包布丁
Bread pudding is usually not a high end or fancy dessert in my mind -- maybe because it calls for the “Left-over or stale bread” as the main ingredient. I’m not a big fans of bread pudding until I find this Japanese bread pudding recipe-- as it tastes like a creme brulee and the custard mask the bread very well. Since then, this is one of my favorite dessert in my “dessert journey”.
1) Ingredient
a. Sandwich bread 8 pieces, remove the edges
b. Can pears, 1 large can
c. Granulated sugar for caramel 4-5 tbsp
d. Water 1+1 tbsp
e. 3 Eggs
f. Granulated sugar for custard sauce 6 tbsp
g. Milk 360-480ml (1.5-2 cups) ß-- I used 360ml heavy whipping cream and 120ml fat free milk.
h. Vanilla extract to taste ß-- I used 1-2 tbsp
i. Rum 1 tbsp
j. Bread pan—18x8x8cm, greased.
2) Make caramel: In medium heat, cook 4-5 tbsp sugar and 1 tbsp water in a sauce pan. When it turns into caramel color, turn off the heat and add 1tbsp water. **Be careful, it will splash!** Pour the caramel into the bread pan and let it cool.
3) Make custard sauce: Add eggs, 6 tbsp sugar, milk/cream, vanilla extract, and rum, mix well.
4) Slice the pears into thin slices, have the edge of the bread removed.
5) Layer bread and pear slices alternatively with the bread as the last layer.
6) Pour the custard sauce over the bread-pear stack and soak it for 30-40 mins
7) Bake it in a hot water bath @ 160* C (320* F) for 40-50 mins ß--I baked it for >1 hr until the toothpick for checking is clear when pulled out.
8) Put it into a refrigerator and chill it before serving
**It taste good when warm it in microwave for 30-45 seconds and serve it with icecream ^^ **
材料:
a) 三文治麵包/方包.大概八片.切除邊/皮.
b) 罐頭梨子,大罐一罐.
c) 白糖 (製焦糖) 5大湯匙
d) 水 1+1湯匙
e) 蛋,3隻
f) 沙糖(製吉士打布丁用) 6大湯匙
g) 牛奶360-480ml/1.5-2杯 (本人用240ml牛奶,240ml 鮮忌廉. )
h) 雲尼拿香油,1-2 小茶匙
i) 醂酒 1大湯匙
j) 麵包焗盆,塗油備用.
製作:
1) 製 焦糖: 用中火,加入 5大湯匙的沙糖及一大湯匙的水入煲內. 煮至銅金色,息火 加入另一大湯匙的水. 把焦糖倒入麵包焗盆內, 待為冷卻.
2) 製布丁漿: 把三隻蛋,六大湯匙的糖,1.5-2杯的牛奶/忌廉 , 雲尼拿香油, 及醂酒 加入一中形器皿中攪拌均勻.
3) 把罐頭梨子切薄片; 麵包去皮/邊.
4)把麵包放入麵包焗盆裡, 鋪上一層, 把梨子鋪在麵包上作第二層, 重複鋪麵包/梨子直至鋪滿焗盆. 最後一層最好是麵包.
5) 把布丁漿倒入焗盆中, 大概泡三十至四十分鐘.
6) 焗爐預熱至3200F/1600 C. 把焗盆放入已加入熱水的盆中,一同 放入焗爐,烤大概40-50分鐘(本人用了60分鐘)
7) 用竹籤插入中央,若竹籤拉出來沒有粉漿粘在竹籤上,這表示麵包布丁以完成.
8) 待麵包布丁冷卻, 放入冰箱冷凍.
Friday, April 20, 2012
Apple-pear tart.
Sometime it is hard to decide what to bring for a potluck. Fancy Macarons? Labor-intensive palmiers? Or something basic like apple pie? After a long debate between my evil left brain and my divine right head, I’ve chose the basic --- because, it's simple, it’s classic, it reminds you the good old time.
Thin-crusted apple tart. (Simplified, adapted from Michele Anna Jordan LA times recipe)
Ingredient:
1) Juice of 1 lemon
2) 3-5 apples depends on the size, peeled ( I used the apple with the size like a soft ball, 4 of them)
3) 3 Tbsp melted butter
4) 3 Tbsp granulated sugar
5) 1 tsp ground cinnamon
6) ⅛ ground clove
7) ⅛ tsp ground nutmeg
8) ½ cup of canned pear
9) A handful of dried cranberry
In order to honor a “BASIC and SIMPLE” apple tart, I chose to use Pillsbury pie dough instead of making it myself. =P
How to...
a) Pre-heat the oven @ 3750F
b) Halve the apple and remove the core & the stalk. Sliced the apple lengthwise into very
thin slices. Put the apple into a bowl of water added with lemon juice.
c) Unroll the pie dough and place it on a greased baking pan. Turn up the outer edge of the circle of the dough and form a rim. Use a fork to press the rim into place and prick the tart, bottom and the side, in several place.
d) Drain and dry the apples thoroughly (I lay apple in between paper towel and press on them generously)
e) Arrange a circle of overlapping apple slices staring at the far edge of the dough. Repeat for 2 layers.
f) After 2 layer of apple, put the pear slices and dried cranberry in the middle of the tart. Layer apple at the outer edge to make the filling at even level.
g) Layer a circle of overlapping apple slices again and finish with a small circle of apples in the center.
h) Brush the apple and outer rim of the dough with the melted butter.
i) In a small bowl, combine cinnamon, clove, nutmeg and sugar together. Sprinkle the mixture over the apple (I sprinkle a small amount of the mixture over each layer of the apples)
j)Bake the tart for 40-45 mins until the crust is golden brown.
Bon Appétit ~
薄蘋果餅
有時候真的不知道聚餐時該帶些什麼”貢品”. 法式花悄的馬卡龍 巧手工的Palmiers? 還是帶最簡單的蘋果批? 經過左右腦大戰三百會合後, 最終決定還是蘋果批---喜歡它的簡單,比較經典,能勾起心弦,回想起美好的回憶.
材料:
1) 檸檬1個,取汁
2) 蘋果3-5個視乎蘋果的大小. (我用與手球同樣大的蘋果4個)
3) 已溶的牛油3大湯匙
4) 白沙糖3大湯匙
5) 肉桂粉1小茶匙
6) 丁香粉 ⅛ 小茶匙
7) 肉荳蔻粉 ⅛ 小茶匙
8) 大概半杯 罐頭洋梨
9) 酸果蔓 適量
為配合簡單為題, 在此選用 預製的批底.
製作:
a) 預熱,焗爐大概3750F, 1900C
b) 把蘋果切半,去皮去心切薄片(大概1/16 寸薄) 放入已加檸檬水的冷水裡.
c) 展開 預製的批底,放在已塗油的焗盤上,把外緣疊上. 用叉把邊壓好, 在批底及側邊刺些小孔.
d) 用餐巾把蘋果印乾水份.
e) 把蘋果由批底外圈重疊擺放,重複兩`次.
f) 把洋梨片及酸果蔓放在批中心,盡量與蘋果的水平舖至一樣.
g) 再舖上蘋果片,重疊地,圍上圓圈. 最後在中央圍出一個小圓圈
h) 在蘋果及批邊塗上牛油
i) 於小碗裡, 把肉桂,丁香,肉荳蔻粉及糖混合/ 拌勻, 灑在蘋果上. (我在每一層都灑上少許)
j) 放入焗爐裡烤40-45 分鐘 至批辮呈金黃色.
Subscribe to:
Posts (Atom)