The Cinderella dress: wrapping from a
Tupperware with recycled materials

Bridal Shower!!
Hasn’t had it for a long time!
One of our new dietitians is getting married and getting the Tupperware
from her registry doesn’t sound fancy or romantic to me. Well, that’s the case when I procrastinate
and most of the items are gone from her list.
I guess I am going to buy the gift and give the non fancy gift a fancy
wrap —just like a small dog need a big
name.
Instruction:
1)
Gather all the materials for wrapping: the gift, wrapping paper, table cloth, tape-big
and small, “bubble paper”, “air bag”-for structure (usually get
it as a filler in shipment), recycle paper (when you buy glassware in a store,
usually the cashier will wrap your fragile items with this recycle wrapping
paper. I usually will save some for crafting), scissors, blazer, ribbons,
accessory to decorate the dress.


2)
Unboxed the Tupperware, play around with
stacking the tub and see which combination of stacking do you like.


3)
Use the big tape to secure the biggest /bottom
tub with the box (the box wrapped with recycle paper)


4)
Wrap the remaining box with the nice wrapping
paper. (Wrap the paper from bottom)

5)
Continue to use big tape to secure each layer or
group of Tupperware. (Suggest to group Tupperware
by size and usually will be 4-6 Tupperware in one group)

6)
Make sure the whole tower of Tupperware is
secure with tape, and then wrap the tower with the bubble paper. Place the bubble-side with the Tupperware and
smooth side up to create a smooth surface for wrapping


7)
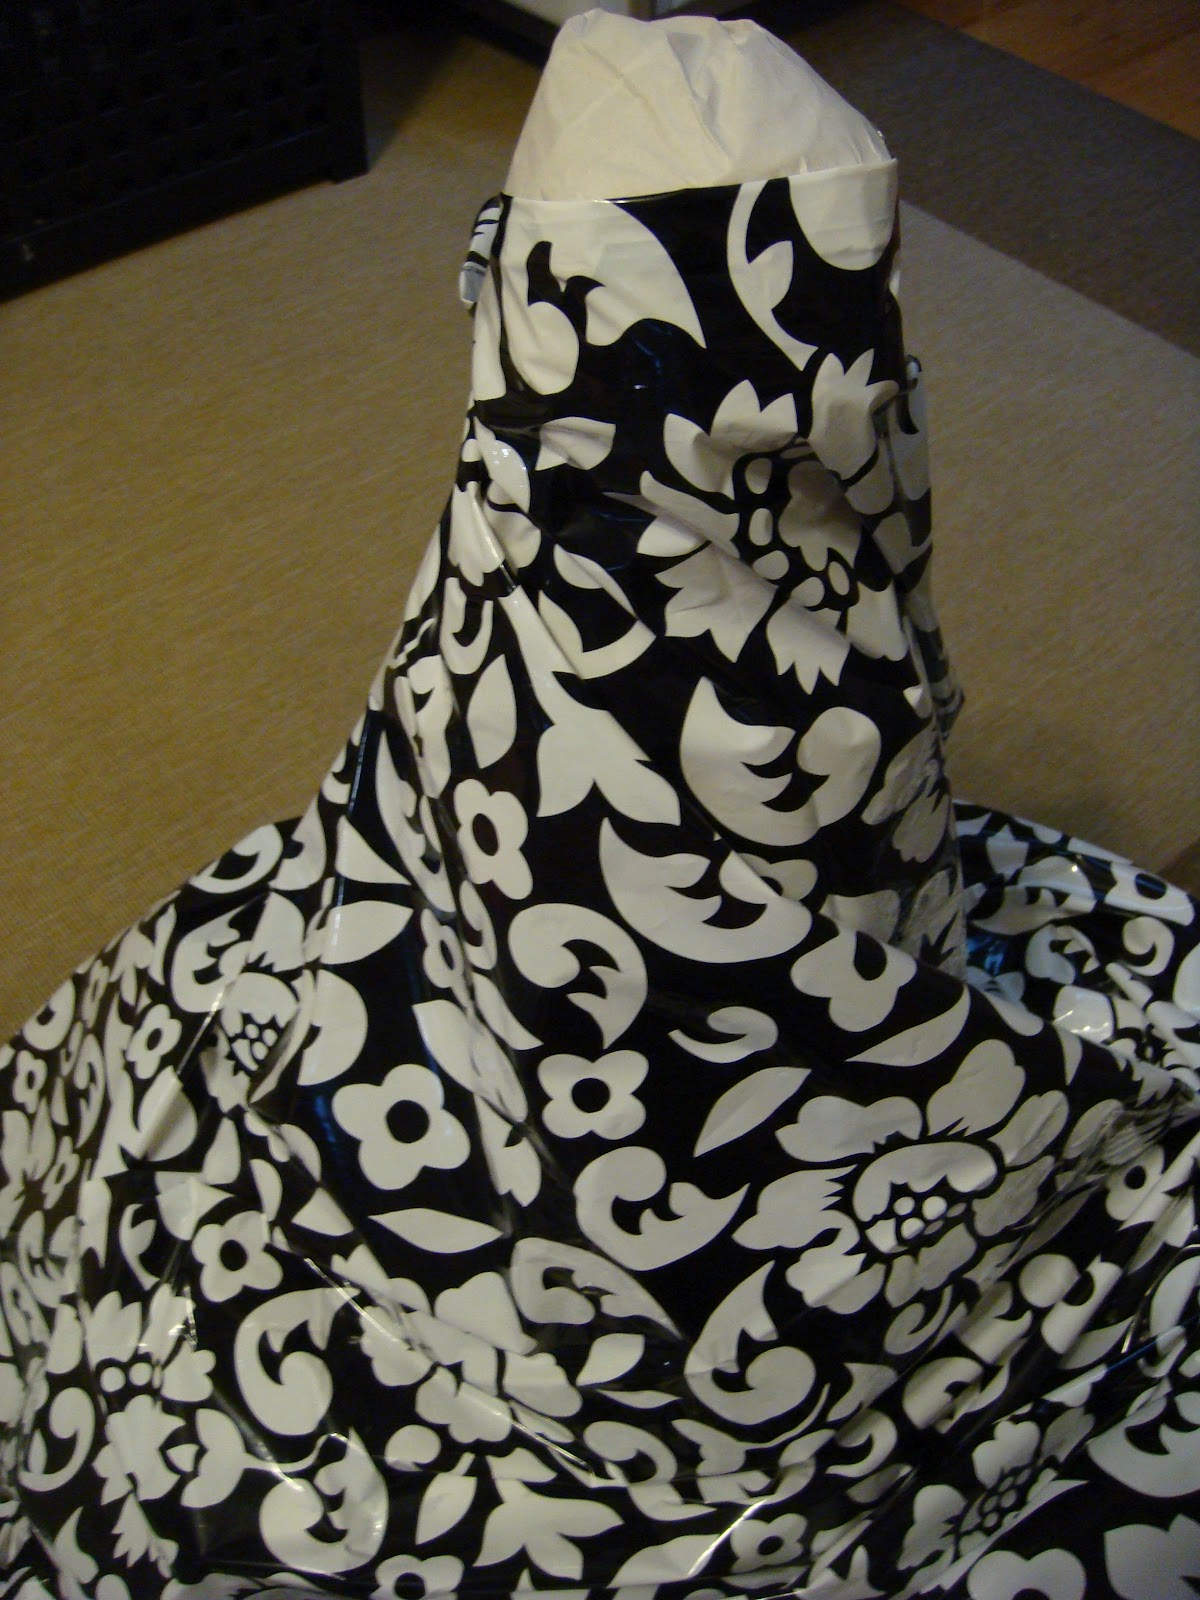
Wrap the tower with the recycle paper and the
top of the tower will be the “Shoulder and chest” of the manikin

8)
Smooth the top of the tower, maybe place an
extra bubble paper around the breast area to make it bulbous. Wrap the chest with the table cloth, tape and
stable it, and then let the table cloth flow down like a dress.

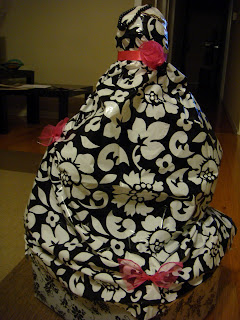
9)
Tie a ribbon around the waist (optional: use
ribbon to make a flower and place it around the waist) Prefer to use the same
ribbon to make mini ribbon bows to decorate the dress. (Use the ribbon to tie a
knot, then cut at the long end to make both end looks the same)

10)
Put the “air bag” underneath the dress and make
it puffed up at the place you desired
11)
Attach the ribbon bow on the dress (I sew it
with thread and needle. I think double sided
tape should work as well)


12)
I use loose beads to make a necklace and use a
lace to wrap around the necklace to make the imaginary “neck outline” more
pronounce

13)
Step back and take a look. Do you need to add more detail?
14)
Finish~
灰姑娘的新衣: 廢物利用/舊物新用包裝法
其中一位新營養師同事快要結婚了~久違了的新娘婚前派對快將舉行~!! 由於我遲遲也沒有在她的禮物註冊處中揀選禮物, 當我要購買禮物時已所剩無己了. 那我只好購買那嘅不浪漫又不豪華的食物盒作禮物-這總比空手好. 當小狗也需要為它改個雄壯大名時, 那這不華麗的禮物也需要一個華麗的包裝.

製作:
1)
把所有包裝用的物料都拿出來, 例如包裝紙, 禮物盒,
膠/紙檯布,
大及小的膠紙,
“氣泡”保護/包裝紙,
“氣袋”-
以作架構用(一般都用在包裹裡把空位塞滿);
回收再造紙
(超市職員常用這種再造紙來包裝 玻璃易碎物品. 我常回收再造紙用來做手工), 剪刀,刀片,
緞帶,
各式各樣的裝飾物.
2)
打開原裝的禮盒, 把膠盒拿出來, 嘗試不同組合的 配搭及層層疊, 看看那個方式的配搭比較適合.
3)
利用大的膠紙把最大/底部的膠盒牢牢的穩定在禮盒上(禮盒預先用再造紙包好)
4)
用花紙把禮盒包好(從底部包起,尾端就在膠盒下)
5)
利用大膠紙把每層的膠盒穩固好(建議以4-6 個膠盒為一組或以盒子大小來分組,利用膠紙把一組膠盒黏在上一組的膠盒上)

6)
利用大膠紙把整座膠盒塔穩固好, 然後用”氣泡”包裝紙包在膠盒塔外. 氣泡那面向內,平滑的一面向外:
形造一個表面平滑的 包裝表面.
7)
用回收再造紙包在”氣泡”包裝紙外;
塔的頂端便是”模型人”的肩膀及胸口.
8)
把頂端的紙掃平; 喜歡的話: 在胸口處多加些氣泡紙,令曲線更明顯.
用檯布由胸口包起,利用膠紙穩固好.
把檯布鬆開讓它自然垂下.

9)
用緞帶在腰部打結,製造腰線(你亦可選擇 用緞帶製造花朵,裝飾腰部) 用相同的緞帶製造迷你蝴蝶結,裝飾裙子
(用緞帶打結,
剪斷長的一邊令兩邊的長度一樣)

10)
把”氣袋”放置在裙子下, 令裙子蓬起
11)
把迷你蝴蝶結連接在裙子上(我用針線把迷你蝴蝶結縫在裙子上,
我相信雙面膠紙亦能達到同一樣的工效.
12)
我用獨立珠子串起來來做一條頸鍊, 再用蕾絲襯托鍊子,令頸線凸出

13)
退後數步, 檢查一下~需要多加裝飾物嗎?
14)
變身完成

No comments:
Post a Comment